Steve Johnson Modelmaker
|
|
Harland &
Wolff 7057 0-6-0DM LMS 7057 was an unusual beast for several reasons. Built in 1934 by the famous shipbuilders Harland & Wolff at their Belfast works, it was only one of eight locomotives built by the company. Powered by a 175hp 2 stroke engine, transmission was via a fluid coupling to a two stage gearbox driving the front axle. It was the least successful of the initial batch of LMS shunters, mainly being too slow, at 10mph, for the work intended for it. It is thought to have spent some time working as WD233 at the WD Depot in Sinfin Lane, Derby in the 1940's. It was withdrawn by the LMS in 1944 and sold back to Harland & Wolff. They rebuilt the locomotive, now 5ft. 3in. gauge and a 225hp engine, and it spent some time on loan to the Northern Counties Committee. It was eventually purchased by the NCC's successor, the Ulster Transport Authority, in 1949 and ran as No.22. It was eventually withdrawn and scrapped in 1965.
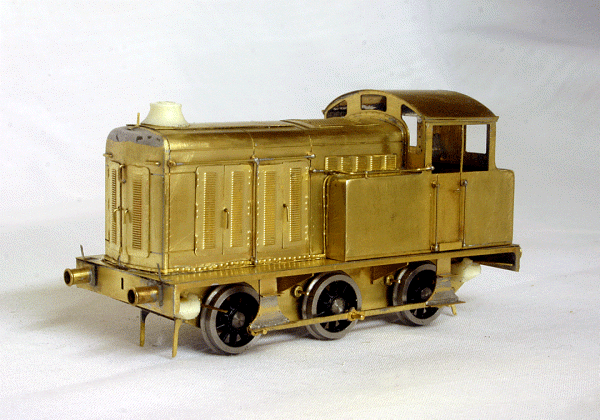
LMS 7057 in the later livery Judith Edge Kits produced a kit of this locomotive in September 2018. It was one of my 'must build', so I quickly obtained one. Parts are provided for the LMS version and the UTA version with the extended engine casing up to cab roof level. It can be built to 21mm gauge quite simply by using longer axles and washers. Apparently this is all that Harland & Wolff did! Construction is straightforward and to Michaels usual system of chassis, footplate and body sub-assemblies. My version is being build as a rigid 16.5mm chassis. The chassis was assembled using my Poppy's Woodtech chassis jig in order to get a square chassis, important for a rigid unit.
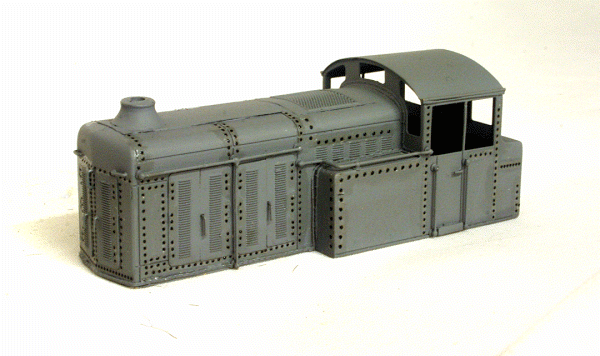
Assembled awaiting primer The prototype features a large number of rivets in its construction and half etch rivet positions are provided on the back of the relevant etches. However, I have had problems punching these out and trying to get them even, not to mention ending up with curved panels and there is a lot of rivet detail. Instead, I chose to use the Archer waterslide transfer rivets applied after priming, but before the top coat. I have used these successfully on other models to good effect. There is plenty of room inside the body to accommodate a a Mashima 1024 motor and High Level Kits Loadhauler gearbox. I chose the 80:1 ratio version for slow running. The wheels and sprung buffers are Gibson 4839G and 4903 respectively. For this model, I decided not to use the Gibson crankpins but to fit the Markits ones instead. This requires carefully opening out the crankpin hole and cutting a 10BA thread with a tap. The standard Markits crankpins will then screw in. As the Gibson wheels are plastic centred, care needs to be taken when soldering the retaining washers onto the crankpin. With this work done, the chassis was primed and then painted black and varnished., The chassis was then assembled and tested.
7057 primed and with completed chassis The model was designed for use with DCC and I decided to fit the LaisDCC 860010 decoder. This was fixed to the top of the motor and wired accordingly. Unlike my other models, I decided not to fit a working cab light. This is because there isn't any cab detail. Unfortunately no information on the cab layout has come to light. If it ever does, I will fit both the detail and light. With a running chassis, attention was turned once again to the body. Once fully assembled, it was primed with my usual Halfords Grey Primer. A couple of imperfections were tidied up and another waft of primer used to check. Now came the rather time consuming job of applying the Archer rivet transfers. As I mentioned, there are a lot of them! Once applied, the model was sprayed gloss black and the beams painted red. Weight was added to the inside of the body in the form of lead sheet cut to size. This was positioned under the bonnet, in the side panels and at the rear of the cab to maintain an even weight distribution.
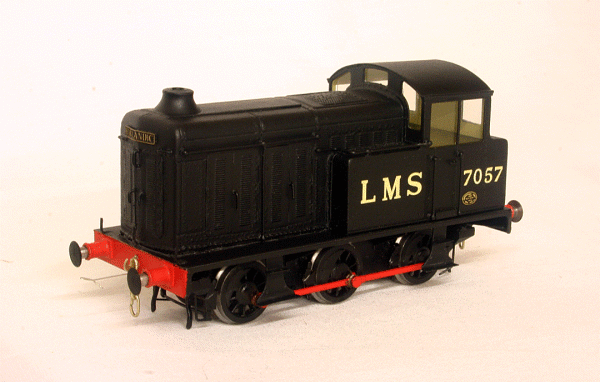
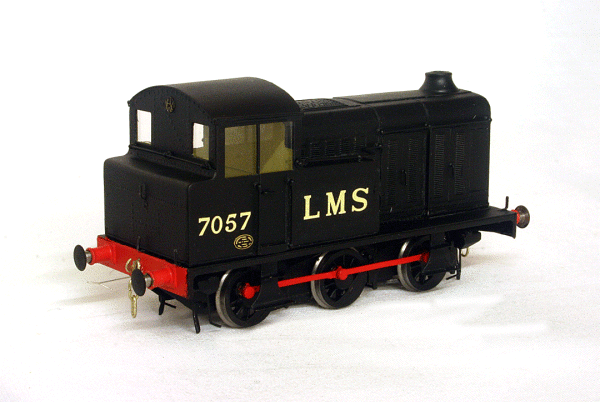
7057 with the Archer rivet transfers applied Now came the problem of transfers. The photographs I have seen of 7057 show it in three different LMS liveries. The first, taken at the Harland & Wolff Works used polished steel, or aluminium, LMS letters ahead of the cab door but no numbers. The second shows the locomotive in black with what is described as straw coloured sans-serif LMS letters and below, smaller numbers ahead of the cab door. Some publications have described these as standard LMS 12in. and 10in. However, when I applied these in transfer form, they were far too big and did not match any photographs. So, I can only assume that the letters and numbers were hand painted in a smaller size. The third photograph shows the locomotive in black but this time with straw coloured serif LMS letters ahead of the cab door and smaller numbers on the panel behind. The transfers I had to hand seemed to match the photographs quite well, so I used these. The works plate (just a generic one I had to hand) had been moved by this time to below the numbers. The cab interior was painted cream and the whole body varnished with my usual Phoenix-Precision satin varnish. The windows were glazed in clear acetate and the locomotive assembled. The buffers were fitted along with some Exactoscale drawhooks and chains. Finally, the Alex Jackson couplings were fitted.
I am pleased with the result and have now finally have a good model of this somewhat unusual looking prototype.
|